
Views: 0 Author: Site Editor Publish Time: 2026-06-13 Origin: Site


Driving at night behind clouded lenses feels like navigating through a thick fog. Over time, constant sunlight and flying road debris heavily degrade your polycarbonate lenses. Foggy, oxidized car lights reduce nighttime visibility by up to 80%. This massive drop in illumination creates severe safety hazards on unlit roads. It also poses significant compliance risks during strict state vehicle inspections.
As a vehicle owner, you probably face a daily barrage of confusing advice. Viral DIY hacks promise instant miracles for pennies. Heavily marketed restoration kits claim professional results in minutes. Meanwhile, aftermarket replacements seem like a large upfront investment. How do you choose the right path? You need a permanent, cost-effective fix rather than a fleeting trick. Your safety relies on bright, focused beam patterns.
This guide cuts through the noise and anecdotal claims. We provide an evidence-based decision framework. You will learn how to properly weigh restoring clarity against upgrading to brand-new assemblies. We outline the exact chemical reasons why quick fixes fail. You will discover exactly when surface sanding works and when you must replace the entire housing.
Oxidation is a chemical degradation of the factory UV hard coat, not just surface dirt; permanent fixes require removing and replacing this protective layer.
Household hacks (toothpaste, lemons) offer only temporary visual improvements and often accelerate long-term damage by stripping residual UV protection.
Commercial restoration kits are viable for surface-level yellowing but require meticulous, multi-stage wet sanding and chemical sealing to last beyond a few months.
Upgrading to premium car lights is the most reliable, long-term solution when lenses suffer from internal condensation, micro-cracking (crazing), or compromised seals.
Modern vehicles use polycarbonate plastic for headlamp assemblies. Automotive manufacturers choose this lightweight material for its exceptional impact resistance. It easily survives strikes from small rocks. However, raw polycarbonate reacts aggressively to ultraviolet radiation. To combat this, factories apply a specialized, baked-on clear coat to block harsh sun rays.
Over the years, flying road debris, acidic rain, and harsh car wash chemicals chip this coating away. Once the protective layer wears thin, UV rays trigger photo-oxidation. They chemically degrade the underlying plastic. The surface turns distinctly yellow, cloudy, and rough to the touch. This is a structural breakdown, not just surface dirt.
You must differentiate between external and internal damage before attempting any fix. External oxidation feels chalky and sits purely on the outside. You can safely sand and restore this outer surface. Internal damage tells a different story. Internal moisture looks like foggy condensation trapped inside the sealed lens. Deep micro-cracks, known as crazing, also happen inside the plastic structure. You cannot sand away internal condensation or deep structural cracks.
Many drivers fall for the illusion of "wipe-on" fixes seen on social media. You might spray bug repellent or wipe a chemical solvent over the cloudy lens. The plastic instantly looks crystal clear. Why does this happen? These aggressive chemicals act as filling solvents. They melt the topmost layer of plastic and temporarily fill the microscopic scratches. Once the solvent evaporates, the raw plastic remains fully exposed to the sun. The photo-oxidation process actually accelerates. Your lenses will turn yellow again within days.
Social media platforms overflow with supposed miracle cures for foggy lenses. We need a strict reality check on these viral "life hacks." We must compare them against proper commercial restoration methods.
People frequently rub lemons, baking soda, or whitening toothpaste on their lenses. They hope for a cheap, immediate fix.
Mechanism: These household items contain mild abrasives or mild acids. They physically scrape off the topmost layer of yellowed residue.
The Risk: They strip away the grime but leave the polycarbonate completely bare. You leave the plastic entirely unprotected against future UV damage. Clarity usually fades completely within two to three weeks. Experts agree this is never a viable long-term solution. In fact, it often ruins whatever factory UV coating you had left.
If you want a bridge between rubbing lemons and buying new assemblies, commercial kits offer a viable middle-ground. However, they require strict adherence to instructions.
Evaluation Criteria: Do not buy a cheap kit lacking essential components. A legitimate kit must include varying grits of wet sandpaper (e.g., 800, 1500, 3000 grit). It must contain a dedicated liquid polishing compound. Crucially, it must supply a dedicated UV sealant to replace the factory hard coat.
Implementation Realities: Restoring lenses properly demands serious physical effort. You will spend roughly one to two hours of concentrated labor per lens. Drill attachments help immensely. However, drill pads require careful handling to avoid burning or melting the plastic. You also need strict environmental controls. You must work in a dust-free garage. You need specific moderate humidity levels for the clear coat to cure properly without hazing.
Longevity Expectation: If you apply the final UV sealant flawlessly, expect the results to last one to three years. Skipping the sealant guarantees failure within months.
Many beginners ruin their lenses during the sanding phase. They dry-sand the plastic instead of keeping it generously lubricated with soapy water. Dry friction creates intense heat. This heat quickly melts the polycarbonate and leaves deep, unfixable gouges. Another common error involves skipping sandpaper grits. You must progress smoothly from 800 to 1500, then to 3000 grit. Skipping steps leaves visible scratch marks under the final clear coat.
Method | Mechanism | Expected Longevity | Risk Factor |
|---|---|---|---|
DIY Household Hacks | Mild abrasives (toothpaste, baking soda) | 1–4 weeks | High (strips remaining UV protection) |
Wipe-on Solvents | Fills scratches temporarily (bug spray, WD-40) | A few days | High (melts plastic integrity) |
Professional Kit | Multi-stage wet sanding + UV sealant | 1–3 years | Medium (requires precise curing conditions) |
Sometimes, physical labor yields zero return. You must know exactly when to stop sanding. Time spent repeatedly restoring severely degraded lenses quickly eclipses the cost of replacement assemblies. If you value your weekend hours, buying new parts often makes better sense.
Clear indicators show when surface restoration will ultimately fail. We use these specific defects as success criteria for full replacement:
Seal Failure: Look for condensation, droplets, or standing water inside the housing. A broken factory seal lets ambient moisture constantly seep inside. Sanding the outside does absolutely nothing for internal fog. You must replace unsealed units.
Crazing: Inspect the lens closely under bright light for crazing. These look like deep, spider-web micro-cracks. They run throughout the internal thickness of the plastic. You cannot sand them out without grinding a massive hole straight through the lens.
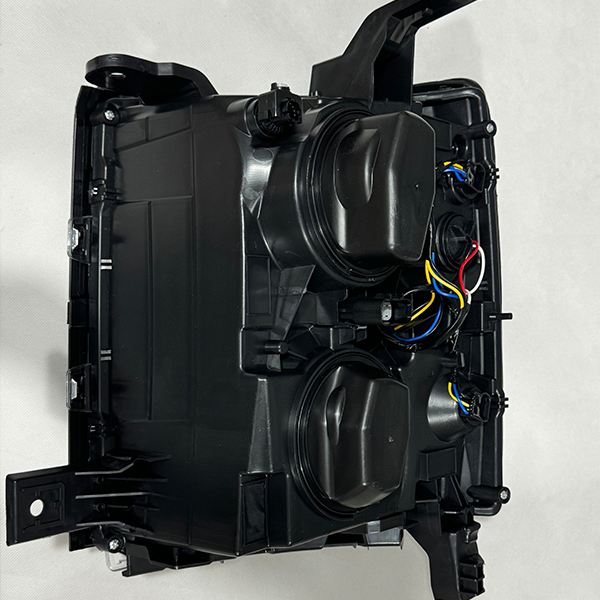
Reflector Burnout: Check the internal projector bowls behind the bulb. If the reflective chrome looks dull, bubbled, or flaking, your light output will remain dangerously dim. Crystal clear outer lenses cannot fix burnt internal reflectors.
If your vehicle suffers from seal failure or burnt reflectors, you need new assemblies. Installing premium car lights guarantees 100% optical clarity immediately. Furthermore, it modernizes your vehicle's safety footprint.
Upgrading from old halogen reflectors to modern LED projectors drastically improves nighttime visibility. It restores perfect factory-level illumination instantly. New assemblies drop right into the factory mounting points. They plug directly into your existing wiring harness. You avoid hours of tedious wet sanding and messy clear coat application. You also guarantee perfect compliance with federal safety regulations.
Making the right choice depends entirely on your vehicle's current condition and your ownership goals. Here is a practical breakdown of three common situations.
If you plan to trade in or sell your car within six months, spending hundreds makes little sense. You just need to pass an inspection and look good for buyers.
Recommendation: Buy a high-quality DIY restoration kit. This costs roughly $25 to $50. It maximizes curb appeal with minimal financial investment. The buyer sees clear lenses, and you pass local safety inspections easily. The 1-to-3-year lifespan perfectly bridges the gap to the new owner.
Your car runs perfectly, but the lenses just started looking slightly cloudy. You plan to keep driving it for three to five more years.
Recommendation: Pay for professional detailing or professional restoration. Expect to spend between $100 and $150. A professional detailer ensures proper UV hard-coat reapplication. They possess the rotary tools to buff the plastic effectively. You avoid the high DIY risk of burning the plastic yourself.
You intend to drive this vehicle into the ground over the next decade. The lenses exhibit deep crazing, or water actively sloshes inside the housing after a rainstorm.
Recommendation: Replace the entire assembly. You can purchase aftermarket units or premium car lights. You spend absolutely zero labor on tedious sanding. You receive a guaranteed perfect beam pattern. You also ensure total compliance with strict DOT and SAE visibility standards.
Restoring optical clarity to your vehicle requires choosing the right tool for the specific damage. Base your final decision on the actual physical state of the lens housing. Do not base it purely on the upfront cost of materials.
If the damage consists strictly of external, chalky oxidation, a strict multi-step restoration kit acts as a highly valid bridge. It works well if you apply the UV sealant correctly. Household hacks and chemical wipes only cause further degradation.
Your next step requires immediate action. Go outside and physically inspect your assemblies today. Run your fingernail across the plastic. Check closely for internal moisture droplets. Look carefully for deep cracking along the curved edges. If you spot these severe structural defects, bypass the sanding kits entirely. Begin evaluating direct-fit replacement assemblies to guarantee your safety on the dark roads ahead.
A: No. These chemicals act as temporary filling solvents. They smooth the microscopic scratches on the surface for a few days. However, they aggressively strip away your remaining protective coatings. Once the solvent evaporates, the raw plastic takes a massive hit from UV rays. This makes the cloudiness return much faster and look substantially worse than before.
A: Yes. Depending on your state or local laws, inspectors measure your actual beam projection. Light output that falls below a certain visibility threshold due to heavy oxidation is immediate grounds for inspection failure. Cloudy lenses scatter the light beam, blinding oncoming drivers while failing to illuminate your own path.
A: Generally, no. Insurance companies classify damage due to normal wear and tear, like solar UV oxidation, as standard vehicle maintenance. However, there is one major exception. If the internal fogging happens because a collision cracked the factory seal, your policy might cover the replacement assembly under your collision or comprehensive coverage.


