
Views: 0 Author: Site Editor Publish Time: 2026-06-20 Origin: Site


Driving down the highway, you suddenly hear a concerning flapping noise. A quick glance in the rearview mirror reveals a terrifying sight. Your vehicle's front panel is catching the wind and rattling violently. Driving with a compromised panel presents immediate safety hazards and strict legal liabilities on public roads. Loose bumpers range from minor aesthetic annoyances, like broken plastic clips, to severe safety liabilities involving compromised crash bars or misaligned sensors. Ignoring the problem risks the entire panel detaching at high speeds, endangering everyone around you. You need a clear plan to address this issue safely and effectively. We will provide an objective, evidence-based framework to help you properly diagnose the root cause. You will learn how to evaluate various DIY repair methods. Finally, we will help you determine exactly when professional intervention becomes mandatory to protect your vehicle.
Diagnosis dictates the fix: Broken retainer clips are a $10 DIY fix, while torn mounting brackets or damaged crash bars require structural repairs.
Temporary vs. Permanent: Zip-tie "drifter stitches" are viable for emergencies but lack the structural integrity of OEM fastener replacements.
Hidden complexities: Modern automotive bumpers house ADAS (Advanced Driver Assistance Systems) sensors; improper alignment can disable safety features like automatic braking.
Cost evaluation: DIY clip replacement costs under $30, while professional realignment and bracket replacement typically range from $150 to $500+.
You must accurately identify the damage source before attempting any repairs. A thorough visual and physical inspection prevents unnecessary parts purchases. It also keeps you from inadvertently causing more damage to fragile plastic components. Park your vehicle on a flat, well-lit surface. Grab a strong flashlight and a mechanic's creeper. You will need a clear view of the undercarriage. Gently push and pull on the automotive bumper. Observe exactly where the panel flexes. This movement isolates the location of the failed mounting points.
Identifying fastener failure is your next critical step. Modern vehicles rely heavily on plastic retainers. Look closely inside the wheel wells. Inspect the bottom splash shields. You will often spot missing push-pins. Sometimes you find sheared plastic rivets. You might also discover severely rusted bolts. A single missing push-pin can cause significant panel sagging. Replacing these small fasteners usually resolves minor aesthetic issues.
Evaluating bracket and tab integrity requires careful observation. You must differentiate between a panel merely "popped out" of its track and actual physical tearing. Look closely at the seam between the fender and the front cover. If the plastic edge looks smooth, the panel likely slipped out of the retaining track. A firm push might re-engage the clips. However, if you see jagged plastic edges hanging loose, the internal mounting tabs are physically torn. Torn tabs require completely different repair strategies.
Assessing underlying damage ensures your vehicle remains safe to drive. An impact might look minor on the surface. Yet, it could compromise vital structural components underneath. Look through the lower grille openings. Check the foam energy absorber for cracks or deep compressions. Inspect the metal crash bar for bends. Rust forming on newly exposed metal signifies underlying structural shifts. These are major red flags. Structural damage compromises occupant safety during future collisions. Never ignore bent crash bars.
Best Practice: Always use a plastic trim removal tool to inspect tight gaps. This prevents deep paint scratches.
Common Mistake: Yanking aggressively on a sagging panel. This action frequently snaps the few remaining intact mounting tabs.
Sometimes you suffer an impact far from home. You need a fast, reliable method to secure the panel. Using cable ties provides an excellent emergency fix. We call this technique the "drifter stitch." It gets the vehicle home safely. Many track and drift car owners use this method permanently. It also suits older vehicles where cosmetic perfection is no longer a priority. However, you must execute this technique correctly to ensure safety.
Material selection completely dictates the success of this fix. Standard office zip ties will fail quickly. They snap under the intense pressure of highway wind shear. They also degrade rapidly when exposed to sunlight. Emphasize the necessity of heavy-duty nylon cable ties. Choose UV-resistant ties rated for at least 50 pounds of tensile strength. These industrial-grade materials withstand harsh weather degradation. They provide the necessary holding force to keep the bumper firmly attached.
Executing the drifter stitch requires specific steps to prevent further plastic tearing. Follow this execution strategy carefully:
Locate safe anchor points: Find solid plastic sections. Keep entirely away from wiring harnesses. Never anchor ties near hot radiators or moving belts.
Drill relief holes: Mark your hole locations carefully. Drill small holes about a half-inch away from the cracked edge. This prevents the plastic from cracking further under tension.
Cross-lace the ties: Thread the heavy-duty ties through the holes in an "X" pattern. Cross-lacing distributes the physical load evenly across the plastic surface.
Trim and secure: Pull the ties tight using pliers. Cut the excess tails flush to prevent snagging.
We must issue a firm risk and compliance warning here. The drifter stitch is not a structural repair. It will likely fail strict local vehicle safety inspections. It strictly serves as a temporary measure. You should plan a permanent fix as soon as possible.
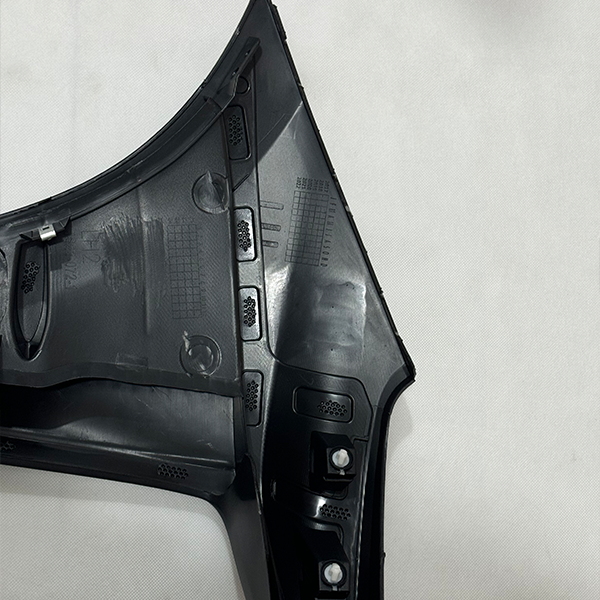
A permanent fix typically involves replacing broken hardware. The operational risk of using generic "universal" clip kits is surprisingly high. Universal clips rarely provide a tight factory fit. They often rattle loose after a few weeks. We strongly advocate sourcing exact-match OEM retainer clips. Look up your vehicle's VIN to find the correct part numbers. Purchasing the correct side brackets guarantees a perfect panel alignment.
Having the required tooling makes the job significantly easier. You do not need a massive professional toolbox. However, specific tools prevent accidental damage. Gather the following items before starting:
Flathead screwdrivers (various sizes)
Specialized nylon trim removal tools
A standard metric socket set
A high-quality flashlight
The realignment process demands patience and a methodical approach. First, safely remove the remaining attached sections of the cover. Taking the panel completely off relieves uneven tension. It prevents you from bending intact clips. Next, unbolt the damaged side-mounting brackets. These plastic tracks bolt directly to the metal fender. Discard the cracked brackets. Bolt the new OEM brackets firmly into place.
Now, carefully position the car bumper over the new tracks. Align the mounting tabs with the bracket slots. Apply firm, even pressure. Push the cover into the track. Listen closely for a distinct, audible "click." This sharp click confirms proper tab engagement. Finally, re-secure all wheel well liners. Bolt the underbody splash shields back into position. Double-check every fastener before driving.
Sometimes the plastic cover itself sustains damage. You might find torn mounting tabs. Replacing the entire painted panel is rarely cost-effective for minor tab damage. You need a specialized approach to restore the original mounting points. Plastic welding offers a highly durable solution. This method saves hundreds of dollars compared to buying a new cover.
Evaluating adhesives versus welding is a crucial step. Many DIYers mistakenly reach for standard epoxy. Unfortunately, standard epoxy performs terribly on automotive polyurethane. Polyurethane flexes continuously during driving. Rigid epoxy simply snaps under this stress. Hot staple plastic welding creates a far superior bond. It melts metal supports directly into the flexible plastic matrix.
The implementation overview involves a few precise steps. First, use a hot staple plastic welder. Press the heated metal staples across the torn tab seam. This bridges the gap and creates a structural skeleton. Next, clip the exposed staple ends flush. Sand the area roughly to create a bonding surface. Finally, apply a two-part flexible structural adhesive over the staples. This adhesive seals the repair and restores the original tab thickness. Once cured, you can drill new mounting holes if necessary.
Consider the ROI before starting this project. Weigh the cost of a plastic welding kit carefully.
Repair Method | Upfront Cost | Durability | Best Use Case |
|---|---|---|---|
Standard Epoxy | $10 - $15 | Low (Brittle) | Cosmetic surface cracks only |
Hot Staple Welding | $40 - $80 | High (Flexible) | Torn mounting tabs and deep structural cracks |
Aftermarket Replacement | $200 - $600+ (Unpainted) | OEM Equivalent | Shattered panels beyond repair |
Deciding between a weekend garage project and a professional body shop appointment is critical. Making the wrong choice can compromise vehicle safety. It can also void warranties. You must evaluate your skill level honestly. Assess the damage scope objectively. Use the following criteria to make an informed decision.
You should absolutely DIY the repair when the damage is superficial. If the issue is limited to missing plastic clips, fix it yourself. You can easily replace broken push-pins or bolt-on side brackets. Ensure there is no paint damage. Check for deep creasing in the plastic. If the panel is straight, you are good to go. Furthermore, DIY is ideal if the vehicle lacks complex front-end electronics.
Conversely, you must hire a professional under specific conditions. Modern vehicles are essentially rolling computers. ADAS sensor calibration is non-negotiable. If the loose panel houses parking sensors, you need a pro. The same applies to radar units for adaptive cruise control. Lane-departure cameras also require expert handling. Misalignment by even a few millimeters can cause catastrophic system failure. The car might brake unexpectedly. It might fail to detect obstacles. Do not risk DIY repairs on ADAS components.
Structural compromise is another mandatory professional repair scenario. Look behind the plastic cover. If the metal rebar is bent, stop immediately. If the crush cans are deformed, call a tow truck. A damaged radiator core support requires a frame machine. Finally, consider the insurance implications. If the damage connects to a multi-vehicle collision, liability is in play. Warranties might depend on certified shop repairs. Protect yourself legally by using a licensed facility.
Ignoring a loose panel risks severe further damage. Wind pressure at highway speeds will eventually rip a compromised cover off the vehicle. This puts you and other drivers in immediate danger. Taking prompt action saves money and ensures road safety.
Always recommend starting with a thorough flashlight inspection. Check the clips and brackets carefully. Do this before purchasing any tools. Do this before booking an expensive shop appointment. Accurate diagnosis prevents wasted effort. Keep these final action steps in mind:
Verify your specific vehicle's bumper schematic online to identify exact fasteners.
Order OEM replacement clips matching your specific VIN.
Use a plastic trim tool to prevent scratching your paint during disassembly.
Never attempt a DIY repair if your vehicle relies on complex ADAS sensors.
Consult a professional immediately if you spot bent metal components underneath.
A: No, it is generally unsafe. A loose panel creates significant aerodynamic drag. Highway speeds generate massive wind resistance. This pressure can violently detach the panel while driving. A flying piece of plastic acts as a dangerous projectile. It could strike another vehicle, potentially causing a severe accident. Always secure the panel temporarily before driving.
A: Sometimes you can, but exercise extreme caution. A gentle push might re-seat an undamaged tab. However, if you feel heavy resistance, stop pushing immediately. Resistance usually means the internal plastic clip is broken or severely bent. Forcing the panel into place will crack the exterior paint and snap the remaining tabs.
A: Costs vary wildly based on the exact damage. A simple clip replacement or minor realignment typically runs between $50 and $100. If the plastic side brackets require replacement, expect to pay $150 to $300. The price scales up rapidly to $500 or more if the shop must recalibrate internal ADAS safety sensors.


